使用注解开发
前面我们已经完成了大部分的配置文件学习,但是我们发现,使用配置文件进行配置,貌似有点太累了吧?可以想象一下,如果我们的项目非常庞大,整个配置文件将会充满Bean配置,并且会继续庞大下去,能否有一种更加高效的方法能够省去配置呢?还记得我们在JavaWeb阶段用到的非常方便东西吗?没错,就是注解。
既然现在要使用注解来进行开发,那么我们就删掉之前的xml配置文件吧,我们来看看使用注解能有多方便。
ApplicationContext context = new AnnotationConfigApplicationContext();现在我们使用AnnotationConfigApplicationContext作为上下文实现,它是注解配置的。
既然现在采用注解,我们就需要使用类来编写配置文件,在之前,我们如果要编写一个配置的话,需要:
<?xml version="1.0" encoding="UTF-8"?>
<beans xmlns="http://www.springframework.org/schema/beans"
       xmlns:xsi="http://www.w3.org/2001/XMLSchema-instance"
       xsi:schemaLocation="http://www.springframework.org/schema/beans
        https://www.springframework.org/schema/beans/spring-beans.xsd">
</beans>
现在我们只需要创建一个配置类就可以了:
@Configuration
public class MainConfiguration {
}
这两者是等价的,同样的,在一开始会提示我们没有配置上下文:

这里按照要求配置一下就可以,同上,这个只是会影响IDEA的代码提示,不会影响程序运行。
我们可以为AnnotationConfigApplicationContext指定一个默认的配置类:
ApplicationContext context = new AnnotationConfigApplicationContext(MainConfiguration.class);
//这个构造方法可以接收多个配置类(更准确的说是多个组件)
那么现在我们该如何配置Bean呢?
@Configuration
public class MainConfiguration {

    @Bean("student")
    public Student student(){
        return new Student();
    }
}
这样写相对于配置文件中的:
<?xml version="1.0" encoding="UTF-8"?>
<beans xmlns="http://www.springframework.org/schema/beans"
       xmlns:xsi="http://www.w3.org/2001/XMLSchema-instance"
       xsi:schemaLocation="http://www.springframework.org/schema/beans
        https://www.springframework.org/schema/beans/spring-beans.xsd">
    <bean name = "student" class="com.test.bean.Student"/>
</beans>
通过@Import还可以引入其他配置类:
@Import(LBWConfiguration.class)  //在讲解到Spring原理时,我们还会遇到它,目前只做了解即可。
@Configuration
public class MainConfiguration {
只不过现在变成了由Java代码为我们提供Bean配置,这样会更加的灵活,也更加便于控制Bean对象的创建。
ApplicationContext context = new AnnotationConfigApplicationContext(MainConfiguration.class);
Student student = context.getBean(Student.class);
System.out.println(student);
使用方法是相同的,这跟使用XML配置是一样的。
那么肯定就有小伙伴好奇了,我们之前使用的那么多特性在哪里配置呢?首先,初始化方法和摧毁方法、自动装配可以直接在@Bean注解中进行配置:
@Bean(name = "", initMethod = "", destroyMethod = "", autowireCandidate = false)
public Student student(){
    return new Student();
}
其次,我们可以使用一些其他的注解来配置其他属性,比如:
@Bean
@Lazy(true)     //对应lazy-init属性
@Scope("prototype")    //对应scope属性
@DependsOn("teacher")    //对应depends-on属性
public Student student(){
    return new Student();
}
对于那些我们需要通过构造方法或是Setter完成依赖注入的Bean,比如:
<bean name="teacher" class="com.test.bean.ProgramTeacher"/>
<bean name="student" class="com.test.bean.Student">
    <property name="teacher" ref="teacher"/>
</bean>
像这种需要引入其他Bean进行的注入,我们可以直接将其作为形式参数放到方法中:
@Configuration
public class MainConfiguration {
    @Bean
    public Teacher teacher(){
        return new Teacher();
    }

    @Bean
    public Student student(Teacher teacher){
        return new Student(teacher);
    }
}
此时我们可以看到,旁边已经出现图标了:

运行程序之后,我们发现,这样确实可以直接得到对应的Bean并使用。
只不过,除了这种基于构造器或是Setter的依赖注入之外,我们也可以直接到Bean对应的类中使用自动装配:
public class Student {
    @Autowired   //使用此注解来进行自动装配,由IoC容器自动为其赋值
    private Teacher teacher;
}
现在,我们甚至连构造方法和Setter都不需要去编写了,就能直接完成自动装配,是不是感觉比那堆配置方便多了?
当然,@Autowired并不是只能用于字段,对于构造方法或是Setter,它同样可以:
public class Student {
    private Teacher teacher;

    @Autowired
    public void setTeacher(Teacher teacher) {
        this.teacher = teacher;
    }
}
@Autowired默认采用byType的方式进行自动装配,也就是说会使用类型进行配,那么要是出现了多个相同类型的Bean,如果我们想要指定使用其中的某一个该怎么办呢?
@Bean("a")
public Teacher teacherA(){
    return new Teacher();
}

@Bean("b")
public Teacher teacherB(){
    return new Teacher();
}
此时,我们可以配合@Qualifier进行名称匹配:
public class Student {
    @Autowired
    @Qualifier("a")   //匹配名称为a的Teacher类型的Bean
    private Teacher teacher;
}
这里需要提一下,在我们旧版本的SSM教程中讲解了@Resource这个注解,但是现在它没有了。
随着Java版本的更新迭代,某些javax包下的包,会被逐渐弃用并移除。在JDK11版本以后,javax.annotation这个包被移除并且更名为jakarta.annotation(我们在JavaWeb篇已经介绍过为什么要改名字了)其中有一个非常重要的注解,叫做@Resource,它的作用与@Autowired时相同的,也可以实现自动装配,但是在IDEA中并不推荐使用@Autowired注解对成员字段进行自动装配,而是推荐使用@Resource,如果需要使用这个注解,还需要额外导入包:
<dependency>
    <groupId>jakarta.annotation</groupId>
    <artifactId>jakarta.annotation-api</artifactId>
    <version>2.1.1</version>
</dependency>
使用方法一样,直接替换掉就可以了:
public class Student {
    @Resource
    private Teacher teacher;
}
只不过,他们两有些机制上的不同:
- @Resource默认ByName如果找不到则ByType,可以添加到set方法、字段上。
- @Autowired默认是byType,只会根据类型寻找,可以添加在构造方法、set方法、字段、方法参数上。
因为@Resource的匹配机制更加合理高效,因此官方并不推荐使用@Autowired字段注入,当然,实际上Spring官方更推荐我们使用基于构造方法或是Setter的@Autowired注入,比如Setter 注入的一个好处是,Setter 方法使该类的对象能够在以后重新配置或重新注入。其实,最后使用哪个注解,还是看你自己,要是有强迫症不能忍受黄标但是又实在想用字段注入,那就用@Resource注解。
除了这个注解之外,还有@PostConstruct和@PreDestroy,它们效果和init-method和destroy-method是一样的:
@PostConstruct
public void init(){
    System.out.println("我是初始化方法");
}

@PreDestroy
public void destroy(){
    System.out.println("我是销毁方法");
}
我们只需要将其添加到对应的方法上即可:
AnnotationConfigApplicationContext context = new AnnotationConfigApplicationContext(MainConfiguration.class);
Student student = context.getBean(Student.class);
context.close();
可以看到效果是完全一样的,这些注解都是jakarta.annotation提供的,有关Spring和JakartaEE的渊源,还请各位小伙伴自行了解。
前面我们介绍了使用@Bean来注册Bean,但是实际上我们发现,如果只是简单将一个类作为Bean的话,这样写还是不太方便,因为都是固定模式,就是单纯的new一个对象出来,能不能像之前一样,让容器自己反射获取构造方法去生成这个对象呢?
肯定是可以的,我们可以在需要注册为Bean的类上添加@Component注解来将一个类进行注册**(现在最常用的方式)**,不过要实现这样的方式,我们需要添加一个自动扫描来告诉Spring,它需要在哪些包中查找我们提供的@Component声明的Bean。
@Component("lbwnb")   //同样可以自己起名字
public class Student {

}
要注册这个类的Bean,只需要添加@Component即可,然后配置一下包扫描:
@Configuration
@ComponentScan("com.test.bean")   //包扫描,这样Spring就会去扫描对应包下所有的类
public class MainConfiguration {

}
Spring在扫描对应包下所有的类时,会自动将那些添加了@Component的类注册为Bean,是不是感觉很方便?只不过这种方式只适用于我们自己编写类的情况,如果是第三方包提供的类,只能使用前者完成注册,并且这种方式并不是那么的灵活。
不过,无论是通过@Bean还是@Component形式注册的Bean,Spring都会为其添加一个默认的name属性,比如:
@Component
public class Student {
}
它的默认名称生产规则依然是类名并按照首字母小写的驼峰命名法来的,所以说对应的就是student:
Student student = (Student) context.getBean("student");   //这样同样可以获取到
System.out.println(student);
同样的,如果是通过@Bean注册的,默认名称是对应的方法名称:
@Bean
public Student artStudent(){
    return new Student();
}Student student = (Student) context.getBean("artStudent");
System.out.println(student);相比传统的XML配置方式,注解形式的配置确实能够减少我们很多工作量。并且,对于这种使用@Component注册的Bean,如果其构造方法不是默认无参构造,那么默认会对其每一个参数都进行自动注入:
@Component
public class Student {
    Teacher teacher;
    public Student(Teacher teacher){   //如果有Teacher类型的Bean,那么这里的参数会被自动注入
        this.teacher = teacher;
    }
}
最后,对于我们之前使用的工厂模式,Spring也提供了接口,我们可以直接实现接口表示这个Bean是一个工厂Bean:
@Component
public class StudentFactory implements FactoryBean<Student> {
    @Override
    public Student getObject() {   //生产的Bean对象
        return new Student();
    }

    @Override
    public Class<?> getObjectType() {   //生产的Bean类型
        return Student.class;
    }

    @Override
    public boolean isSingleton() {   //生产的Bean是否采用单例模式
        return false;
    }
}
实际上跟我们之前在配置文件中编写是一样的,这里就不多说了。
请注意,使用注解虽然可以省事很多,代码也能变得更简洁,但是这并不代表XML配置文件就是没有意义的,它们有着各自的优点,在不同的场景下合理使用,能够起到事半功倍的效果,官方原文:
Are annotations better than XML for configuring Spring?
The introduction of annotation-based configuration raised the question of whether this approach is “better” than XML. The short answer is “it depends.” The long answer is that each approach has its pros and cons, and, usually, it is up to the developer to decide which strategy suits them better. Due to the way they are defined, annotations provide a lot of context in their declaration, leading to shorter and more concise configuration. However, XML excels at wiring up components without touching their source code or recompiling them. Some developers prefer having the wiring close to the source while others argue that annotated classes are no longer POJOs and, furthermore, that the configuration becomes decentralized and harder to control.
No matter the choice, Spring can accommodate both styles and even mix them together. It is worth pointing out that through its JavaConfig option, Spring lets annotations be used in a non-invasive way, without touching the target components source code and that, in terms of tooling, all configuration styles are supported by the Spring Tools for Eclipse.
至此,关于Spring的IoC基础部分,我们就全部介绍完了。在最后,留给各位小伙伴一个问题,现在有两个类:
@Component
public class Student {
    @Resource
    private Teacher teacher;
}@Component
public class Teacher {
@Resource
private Student student;
}这两个类互相需要注入对方的实例对象,这个时候Spring会怎么进行处理呢?如果Bean变成原型模式,Spring又会怎么处理呢?
这个问题我们会在实现原理探究部分进行详细介绍。
Spring高级特性(选学)
注意: 本部分为选学内容,如果Spring基础部分学的不是很明白,不建议看这一部分,在理解清楚之后再来看也可以,但也不是说以后就不用学了,这些东西在某些项目中可能会用到,你迟早还是要回来补的。
前面我们介绍了Spring的基础部分,我们接着来介绍Spring的一些其他高级特性。
Bean Aware
在Spring中提供了一些以Aware结尾的接口,实现了Aware接口的bean在被初始化之后,可以获取相应资源。Aware的中文意思为感知。简单来说,他就是一个标识,实现此接口的类会获得某些感知能力,Spring容器会在Bean被加载时,根据类实现的感知接口,会调用类中实现的对应感知方法。
比如BeanNameAware之类的以Aware结尾的接口,这个接口获取的资源就是BeanName:
@Component
public class Student implements BeanNameAware {   //我们只需要实现这个接口就可以了

    @Override
    public void setBeanName(String name) {   //Bean在加载的时候,容器就会自动调用此方法,将Bean的名称给到我们
        System.out.println("我在加载阶段获得了Bean名字:"+name);
    }
}
又比如BeanClassLoaderAware,那么它能够使得我们可以在Bean加载阶段就获取到当前Bean的类加载器:
@Component
public class Student implements BeanClassLoaderAware {

    @Override
    public void setBeanClassLoader(ClassLoader classLoader) {
        System.out.println(classLoader);
    }
}
有关其他的Aware这里就不一一列举了,我们会在后面的实现原理探究部分逐步认识的。
任务调度
为了执行某些任务,我们可能需要一些非常规的操作,比如我们希望使用多线程来处理我们的结果或是执行一些定时任务,到达指定时间再去执行。这时我们首先想到的就是创建一个新的线程来处理,或是使用TimerTask来完成定时任务,但是我们有了Spring框架之后,就不用这样了,因为Spring框架为我们提供了更加便捷的方式进行任务调度。
首先我们来看异步任务执行,需要使用Spring异步任务支持,我们需要在配置类上添加@EnableAsync注解。
@EnableAsync
@Configuration
@ComponentScan("com.test.bean")
public class MainConfiguration {
}接着我们只需要在需要异步执行的方法上,添加@Async注解即可将此方法标记为异步,当此方法被调用时,会异步执行,也就是新开一个线程执行,而不是在当前线程执行。我们来测试一下:
@Component
public class Student {
    public void syncTest() throws InterruptedException {
        System.out.println(Thread.currentThread().getName()+"我是同步执行的方法,开始...");
        Thread.sleep(3000);
        System.out.println("我是同步执行的方法,结束!");
    }

    @Async
    public void asyncTest() throws InterruptedException {
        System.out.println(Thread.currentThread().getName()+"我是异步执行的方法,开始...");
        Thread.sleep(3000);
        System.out.println("我是异步执行的方法,结束!");
    }
}
现在我们在主方法中分别调用一下试试看:
public static void main(String[] args) throws InterruptedException {
    AnnotationConfigApplicationContext context = new AnnotationConfigApplicationContext(MainConfiguration.class);
    Student student = context.getBean(Student.class);
    student.asyncTest();   //异步执行
    student.syncTest();    //同步执行
}
可以看到,我们的任务执行结果为:

很明显,异步执行的任务并不是在当前线程启动的,而是在其他线程启动的,所以说并不会在当前线程阻塞,可以看到马上就开始执行下一行代码,调用同步执行的任务了。
因此,当我们要将Bean的某个方法设计为异步执行时,就可以直接添加这个注解。但是需要注意,添加此注解要求方法的返回值只能是void或是Future类型才可以(Future类型我们在JUC篇视频教程中有详细介绍)
还有,在使用时,可能还会出现这样的信息:

虽然出现了这样的信息,但是我们的程序依然可以正常运行,这是因为Spring默认会从容器中选择一个Executor类型(这同样是在JUC篇视频教程中介绍的类型)的实例,并使用它来创建线程执行任务,这是Spring推荐的方式,当然,如果没有找到,那么会使用自带的 SimpleAsyncTaskExecutor 处理异步方法调用。
肯定会有小伙伴疑惑,什么情况?!这个方法很明显我们并没有去编写异步执行的逻辑,那么为什么会异步执行呢?这里很明显是同步调用的方法啊。的确,如果这个Bean只是一个简简单单的Student类型的对象,确实做不到。但是它真的只是一个简简单单的Student类型对象吗?
Student student = context.getBean(Student.class);
System.out.println(student.getClass());   //这里我们通过getClass来获取一下类型,你会发现惊喜
我们来看看结果:

???这是什么东西?这实际上Spring帮助我们动态生成的一个代理类,我们原本的类代码已经被修改了,当然,这只是冰山一角,更多的内容,我们还会再AOP面向切片部分中继续为大家进行介绍,能做到这样的操作,这其实都是AOP的功劳。
看完了异步任务,我们接着来看定时任务,定时任务其实就是指定在哪个时候再去执行,在JavaSE阶段我们使用过TimerTask来执行定时任务。Spring中的定时任务是全局性质的,当我们的Spring程序启动后,那么定时任务也就跟着启动了,我们可以在配置类上添加@EnableScheduling注解:
@EnableScheduling
@Configuration
@ComponentScan("com.test.bean")
public class MainConfiguration {
}接着我们可以直接在配置类里面编写定时任务,把我们要做的任务写成方法,并添加@Scheduled注解:
@Scheduled(fixedRate = 2000)   //单位依然是毫秒,这里是每两秒钟打印一次
public void task(){
    System.out.println("我是定时任务!"+new Date());
}
我们注意到@Scheduled中有很多参数,我们需要指定'cron', 'fixedDelay(String)', or 'fixedRate(String)'的其中一个,否则无法创建定时任务,他们的区别如下:
- fixedDelay:在上一次定时任务执行完之后,间隔多久继续执行。
- fixedRate:无论上一次定时任务有没有执行完成,两次任务之间的时间间隔。
- cron:如果嫌上面两个不够灵活,你还可以使用cron表达式来指定任务计划。
这里简单讲解一下cron表达式:https://blog.csdn.net/sunnyzyq/article/details/98597252
监听器
监听器对我们来说也是一个比较陌生的概念,那么何谓监听呢?
监听实际上就是等待某个事件的触发,当事件触发时,对应事件的监听器就会被通知,如果你学习过Java Swing篇视频教程,应该会深有体会,监听器可是很关键的,只不过在Spring中用的不是很频繁罢了。但是这里还是要简单介绍一下:
@Component
public class TestListener implements ApplicationListener<ContextRefreshedEvent> {
    @Override
    public void onApplicationEvent(ContextRefreshedEvent event) {
        System.out.println(event.getApplicationContext());   //可以直接通过事件获取到事件相关的东西
    }
}
要编写监听器,我们只需要让Bean继承ApplicationListener就可以了,并且将类型指定为对应的Event事件,这样,当发生某个事件时就会通知我们,比如ContextRefreshedEvent,这个事件会在Spring容器初始化完成会触发一次:

是不是感觉挺智能的?Spring内部有各种各样的事件,当然我们也可以自己编写事件,然后在某个时刻发布这个事件到所有的监听器:
public class TestEvent extends ApplicationEvent {   //自定义事件需要继承ApplicationEvent
    public TestEvent(Object source) {
        super(source);
    }
}@Component
public class TestListener implements ApplicationListener<TestEvent> {
@Override
public void onApplicationEvent(TestEvent event) {
System.out.println("发生了一次自定义事件,成功监听到!");
}
}比如现在我们希望在定时任务中每秒钟发生一次这个事件:
@Component
public class TaskComponent  implements ApplicationEventPublisherAware {
  	//要发布事件,需要拿到ApplicationEventPublisher,这里我们通过Aware在初始化的时候拿到
  	//实际上我们的ApplicationContext就是ApplicationEventPublisher的实现类,这里拿到的就是
  	//我们创建的ApplicationContext对象
    ApplicationEventPublisher publisher;

    @Scheduled(fixedRate = 1000)   //一秒一次
    public void task(){
      	//直接通过ApplicationEventPublisher的publishEvent方法发布事件
      	//这样,所有这个事件的监听器,都会监听到这个事件发生了
        publisher.publishEvent(new TestEvent(this));
    }

    @Override
    public void setApplicationEventPublisher(ApplicationEventPublisher publisher) {
        this.publisher = publisher;
    }
}
此时,发布事件旁边出现了图标,说明就可以了:

我们可以点击这个图标快速跳转到哪里监听了这个事件,IDEA这些细节做的还是挺好的。我们来看看运行结果吧:

是不是感觉好像也没那么难,这套机制其实还挺简单的,这样,我们就实现了自定义事件发布和监听。
SpringEL表达式
SpEL 是一种强大,简洁的装配 Bean 的方式,它可以通过运行期间执行的表达式将值装配到我们的属性或构造函数当中,更可以调用 JDK 中提供的静态常量,获取外部 Properties 文件中的的配置。
外部属性注入
有些时候,我们甚至可以将一些外部配置文件中的配置进行读取,并完成注入。
我们需要创建以.properties结尾的配置文件,这种配置文件格式很简单,类似于Map,需要一个Key和一个Value,中间使用等号进行连接,这里我们在resource目录下创建一个test.properties文件:
test.name=只因这样,Key就是test.name,Value就是只因,我们可以通过一个注解直接读取到外部配置文件中对应的属性值,首先我们需要引入这个配置文件,我们可以在配置类上添加@PropertySource注解:
@Configuration
@ComponentScan("com.test.bean")
@PropertySource("classpath:test.properties")   //注意,类路径下的文件名称需要在前面加上classpath:
public class MainConfiguration{

}
接着,我们就可以开始快乐的使用了,我们可以使用 @Value 注解将外部配置文件中的值注入到任何我们想要的位置,就像我们之前使用@Resource自动注入一样:
@Component
public class Student {
    @Value("${test.name}")   //这里需要在外层套上 ${ }
    private String name;   //String会被自动赋值为配置文件中对应属性的值

    public void hello(){
        System.out.println("我的名字是:"+name);
    }
}@Value中的${...}表示占位符,它会读取外部配置文件的属性值装配到属性中,如果配置正确没问题的话,这里甚至还会直接显示对应配置项的值:

我们来测试一下吧:

如果遇到乱码的情况,请将配置文件的编码格式切换成UTF-8(可以在IDEA设置中进行配置)然后在@PropertySource注解中添加属性 encoding = "UTF-8" 这样就正常了,当然,其实一般情况下也很少会在配置文件中用到中文。
除了在字段上进行注入之外,我们也可以在需要注入的方法中使用:
@Component
public class Student {
    private final String name;

  	//构造方法中的参数除了被自动注入外,我们也可以选择使用@Value进行注入
    public Student(@Value("${test.name}") String name){
        this.name = name;
    }

    public void hello(){
        System.out.println("我的名字是:"+name);
    }
}
当然,如果我们只是想简单的注入一个常量值,也可以直接填入固定值:
private final String name;
public Student(@Value("10") String name){   //只不过,这里都是常量值了,我干嘛不直接写到代码里呢
    this.name = name;
}
当然,@Value 的功能还远不止这些,配合SpringEL表达式,能够实现更加强大的功能。
SpEL简单使用
Spring官方为我们提供了一套非常高级SpEL表达式,通过使用表达式,我们可以更加灵活地使用Spring框架。
首先我们来看看如何创建一个SpEL表达式:
ExpressionParser parser = new SpelExpressionParser();
Expression exp = parser.parseExpression("'Hello World'");  //使用parseExpression方法来创建一个表达式
System.out.println(exp.getValue());   //表达式最终的运算结果可以通过getValue()获取
这里得到的就是一个很简单的 Hello World 字符串,字符串使用单引号囊括,SpEL是具有运算能力的。
我们可以像写Java一样,对这个字符串进行各种操作,比如调用方法之类的:
Expression exp = parser.parseExpression("'Hello World'.toUpperCase()");   //调用String的toUpperCase方法
System.out.println(exp.getValue());
不仅能调用方法、还可以访问属性、使用构造方法等,是不是感觉挺牛的,居然还能这样玩。
对于Getter方法,我们可以像访问属性一样去使用:
//比如 String.getBytes() 方法,就是一个Getter,那么可以写成 bytes
Expression exp = parser.parseExpression("'Hello World'.bytes");
System.out.println(exp.getValue());
表达式可以不止一级,我们可以多级调用:
Expression exp = parser.parseExpression("'Hello World'.bytes.length");   //继续访问数组的length属性
System.out.println(exp.getValue());
是不是感觉挺好玩的?我们继续来试试看构造方法,其实就是写Java代码,只是可以写成这种表达式而已:
Expression exp = parser.parseExpression("new String('hello world').toUpperCase()");
System.out.println(exp.getValue());
它甚至还支持根据特定表达式,从给定对象中获取属性出来:
@Component
public class Student {
    private final String name;
    public Student(@Value("${test.name}") String name){
        this.name = name;
    }

    public String getName() {    //比如下面要访问name属性,那么这个属性得可以访问才行,访问权限不够是不行的
        return name;
    }
}Student student = context.getBean(Student.class);
ExpressionParser parser = new SpelExpressionParser();
Expression exp = parser.parseExpression("name");
System.out.println(exp.getValue(student)); //直接读取对象的name属性拿到对象属性之后,甚至还可以继续去处理:
Expression exp = parser.parseExpression("name.bytes.length"); //拿到name之后继续getBytes然后length除了获取,我们也可以调用表达式的setValue方法来设定属性的值:
Expression exp = parser.parseExpression("name");
exp.setValue(student, "刻师傅");   //同样的,这个属性得有访问权限且能set才可以,否则会报错
除了属性调用,我们也可以使用运算符进行各种高级运算:
Expression exp = parser.parseExpression("66 > 77");   //比较运算
System.out.println(exp.getValue());Expression exp = parser.parseExpression("99 + 99 * 3"); //算数运算
System.out.println(exp.getValue());对于那些需要导入才能使用的类,我们需要使用一个特殊的语法:
Expression exp = parser.parseExpression("T(java.lang.Math).random()");   //由T()囊括,包含完整包名+类名
//Expression exp = parser.parseExpression("T(System).nanoTime()");   //默认导入的类可以不加包名
System.out.println(exp.getValue());
集合操作相关语法
现在我们的类中存在一些集合类:
@Component
public class Student {
    public Map<String, String> map = Map.of("test", "你干嘛");
    public List<String> list = List.of("AAA", "BBB", "CCC");
}
我们可以使用SpEL快速取出集合中的元素:
Expression exp = parser.parseExpression("map['test']");  //对于Map这里映射型,可以直接使用map[key]来取出value
System.out.println(exp.getValue(student));Expression exp = parser.parseExpression("list[2]"); //对于List、数组这类,可以直接使用[index]
System.out.println(exp.getValue(student));我们也可以快速创建集合:
Expression exp = parser.parseExpression("{5, 2, 1, 4, 6, 7, 0, 3, 9, 8}"); //使用{}来快速创建List集合
List value = (List) exp.getValue();
value.forEach(System.out::println);Expression exp = parser.parseExpression("{{1, 2}, {3, 4}}"); //它是支持嵌套使用的//创建Map也很简单,只需要key:value就可以了,怎么有股JSON味
Expression exp = parser.parseExpression("{name: '小明', info: {address: '北京市朝阳区', tel: 10086}}");
System.out.println(exp.getValue());你以为就这么简单吗,我们还可以直接根据条件获取集合中的元素:
@Component
public class Student {
    public List<Clazz> list = List.of(new Clazz("高等数学", 4));

    public record Clazz(String name, int score){ }
}//现在我们希望从list中获取那些满足我们条件的元素,并组成一个新的集合,我们可以使用.?运算符
Expression exp = parser.parseExpression("list.?[name == '高等数学']");
System.out.println(exp.getValue(student));Expression exp = parser.parseExpression("list.?[score > 3]"); //选择学分大于3分的科目
System.out.println(exp.getValue(student));我们还可以针对某个属性创建对应的投影集合:
Expression exp = parser.parseExpression("list.![name]");   //使用.!创建投影集合,这里创建的时课程名称组成的新集合
System.out.println(exp.getValue(student));
我们接着来介绍安全导航运算符,安全导航运算符用于避免NullPointerException,它来自Groovy语言。通常,当您有对对象的引用时,您可能需要在访问对象的方法或属性之前验证它是否为空。为了避免这种情况,安全导航运算符返回null而不是抛出异常。以下示例显示了如何使用安全导航运算符:
Expression exp = parser.parseExpression("name.toUpperCase()");   //如果Student对象中的name属性为null
System.out.println(exp.getValue(student));
当遇到null时很不方便,我们还得写判断:
if(student.name != null)
    System.out.println(student.name.toUpperCase());
Java 8之后能这样写:
Optional.ofNullable(student.name).ifPresent(System.out::println);但是你如果写过Kotlin:
println(student.name?.toUpperCase());类似于这种判空问题,我们就可以直接使用安全导航运算符,SpEL也支持这种写法:
Expression exp = parser.parseExpression("name?.toUpperCase()");
System.out.println(exp.getValue(student));
当遇到空时,只会得到一个null,而不是直接抛出一个异常:

我们可以将SpEL配合 @Value 注解或是xml配置文件中的value属性使用,比如XML中可以这样写:
<bean id="numberGuess" class="org.spring.samples.NumberGuess">
    <property name="randomNumber" value="#{ T(java.lang.Math).random() * 100.0 }"/>
</bean>
或是使用注解开发:
public class FieldValueTestBean {
    @Value("#{ systemProperties['user.region'] }")
    private String defaultLocale;
}
这样,我们有时候在使用配置文件中的值时,就能进行一些简单的处理了。
有关更多详细语法教程,请前往:https://docs.spring.io/spring-framework/docs/current/reference/html/core.html#expressions-language-ref
AOP面向切片
又是一个听起来很高大上的名词,AOP(Aspect Oriented Programming)思想实际上就是:在运行时,动态地将代码切入到类的指定方法、指定位置上。也就是说,我们可以使用AOP来帮助我们在方法执行前或执行之后,做一些额外的操作,实际上,它就是代理!
通过AOP我们可以在保证原有业务不变的情况下,添加额外的动作,比如我们的某些方法执行完成之后,需要打印日志,那么这个时候,我们就可以使用AOP来帮助我们完成,它可以批量地为这些方法添加动作。可以说,它相当于将我们原有的方法,在不改变源代码的基础上进行了增强处理。
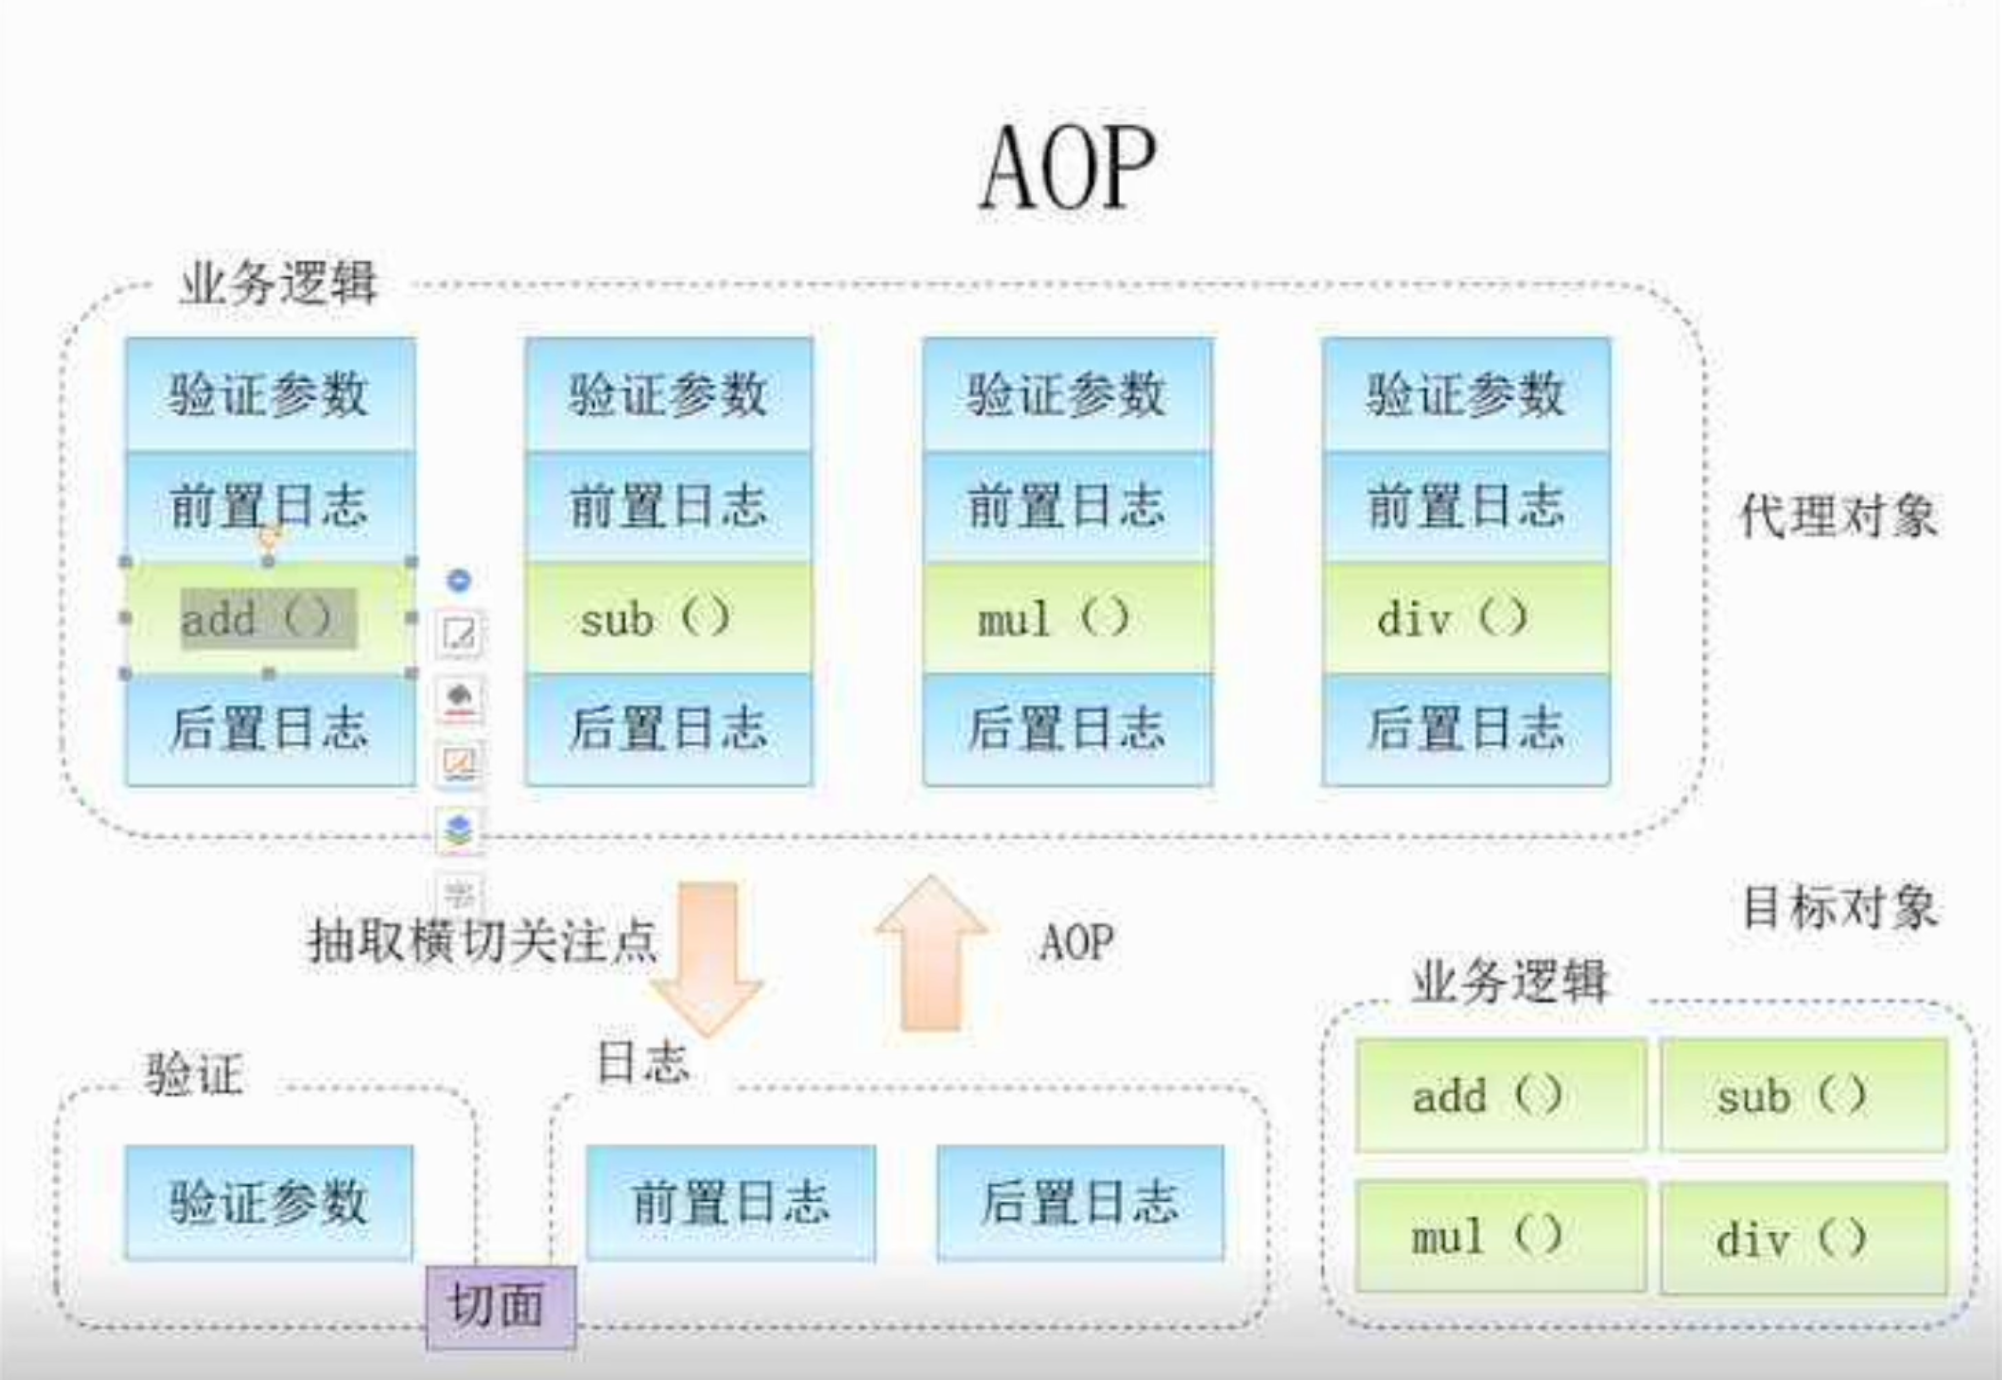
相当于我们的整个业务流程,被直接斩断,并在断掉的位置添加了一个额外的操作,再连接起来,也就是在一个切点位置插入内容。它的原理实际上就是通过动态代理机制实现的,我们在JavaWeb阶段已经给大家讲解过动态代理了。不过Spring底层并不是使用的JDK提供的动态代理,而是使用的第三方库实现,它能够以父类的形式代理,而不仅仅是接口。