并发编程进阶
欢迎来到JUC学习的最后一章,王炸当然是放在最后了。
线程池
在我们的程序中,多多少少都会用到多线程技术,而我们以往都是使用Thread类来创建一个新的线程:
public static void main(String[] args) {
    Thread t = new Thread(() -> System.out.println("Hello World!"));
    t.start();
}
利用多线程,我们的程序可以更加合理地使用CPU多核心资源,在同一时间完成更多的工作。但是,如果我们的程序频繁地创建线程,由于线程的创建和销毁也需要占用系统资源,因此这样会降低我们整个程序的性能,那么怎么做,才能更高效地使用多线程呢?
我们其实可以将已创建的线程复用,利用池化技术,就像数据库连接池一样,我们也可以创建很多个线程,然后反复地使用这些线程,而不对它们进行销毁。
虽然听起来这个想法比较新颖,但是实际上线程池早已利用到各个地方,比如我们的Tomcat服务器,要在同一时间接受和处理大量的请求,那么就必须要在短时间内创建大量的线程,结束后又进行销毁,这显然会导致很大的开销,因此这种情况下使用线程池显然是更好的解决方案。
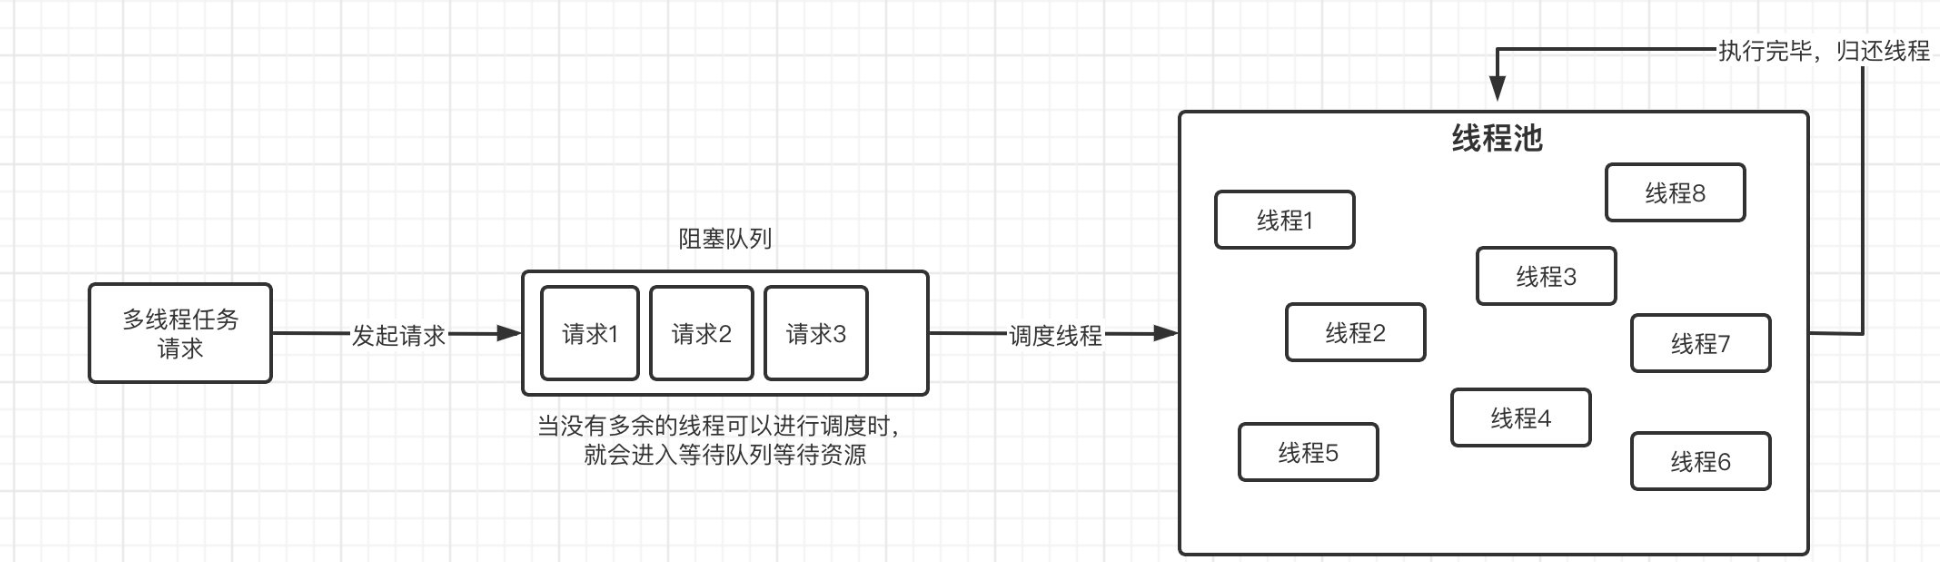
由于线程池可以反复利用已有线程执行多线程操作,所以它一般是有容量限制的,当所有的线程都处于工作状态时,那么新的多线程请求会被阻塞,直到有一个线程空闲出来为止,实际上这里就会用到我们之前讲解的阻塞队列。
所以我们可以暂时得到下面一个样子:
当然,JUC提供的线程池肯定没有这么简单,接下来就让我们深入进行了解。
线程池的使用
我们可以直接创建一个新的线程池对象,它已经提前帮助我们实现好了线程的调度机制,我们先来看它的构造方法:
public ThreadPoolExecutor(int corePoolSize,
                          int maximumPoolSize,
                          long keepAliveTime,
                          TimeUnit unit,
                          BlockingQueue<Runnable> workQueue,
                          ThreadFactory threadFactory,
                          RejectedExecutionHandler handler) {
    if (corePoolSize < 0 ||
        maximumPoolSize <= 0 ||
        maximumPoolSize < corePoolSize ||
        keepAliveTime < 0)
        throw new IllegalArgumentException();
    if (workQueue == null || threadFactory == null || handler == null)
        throw new NullPointerException();
    this.acc = System.getSecurityManager() == null ?
            null :
            AccessController.getContext();
    this.corePoolSize = corePoolSize;
    this.maximumPoolSize = maximumPoolSize;
    this.workQueue = workQueue;
    this.keepAliveTime = unit.toNanos(keepAliveTime);
    this.threadFactory = threadFactory;
    this.handler = handler;
}
参数稍微有一点多,这里我们依次进行讲解:
- corePoolSize:核心线程池大小,我们每向线程池提交一个多线程任务时,都会创建一个新的
核心线程,无论是否存在其他空闲线程,直到到达核心线程池大小为止,之后会尝试复用线程资源。当然也可以在一开始就全部初始化好,调用prestartAllCoreThreads()即可。 - maximumPoolSize:最大线程池大小,当目前线程池中所有的线程都处于运行状态,并且等待队列已满,那么就会直接尝试继续创建新的
非核心线程运行,但是不能超过最大线程池大小。 - keepAliveTime:线程最大空闲时间,当一个
非核心线程空闲超过一定时间,会自动销毁。 - unit:线程最大空闲时间的时间单位
- workQueue:线程等待队列,当线程池中核心线程数已满时,就会将任务暂时存到等待队列中,直到有线程资源可用为止,这里可以使用我们上一章学到的阻塞队列。
- threadFactory:线程创建工厂,我们可以干涉线程池中线程的创建过程,进行自定义。
- handler:拒绝策略,当等待队列和线程池都没有空间了,真的不能再来新的任务时,来了个新的多线程任务,那么只能拒绝了,这时就会根据当前设定的拒绝策略进行处理。
最为重要的就是线程池大小的限定了,这个也是很有学问的,合理地分配大小会使得线程池的执行效率事半功倍:
- 首先我们可以分析一下,线程池执行任务的特性,是CPU 密集型还是 IO 密集型
- CPU密集型: 主要是执行计算任务,响应时间很快,CPU一直在运行,这种任务CPU的利用率很高,那么线程数应该是根据 CPU 核心数来决定,CPU 核心数 = 最大同时执行线程数,以 i5-9400F 处理器为例,CPU 核心数为 6,那么最多就能同时执行 6 个线程。
- IO密集型: 主要是进行 IO 操作,因为执行 IO 操作的时间比较较长,比如从硬盘读取数据之类的,CPU就得等着IO操作,很容易出现空闲状态,导致 CPU 的利用率不高,这种情况下可以适当增加线程池的大小,让更多的线程可以一起进行IO操作,一般可以配置为CPU核心数的2倍。
这里我们手动创建一个新的线程池看看效果:
public static void main(String[] args) throws InterruptedException {
    ThreadPoolExecutor executor =
            new ThreadPoolExecutor(2, 4,   //2个核心线程,最大线程数为4个
                    3, TimeUnit.SECONDS,        //最大空闲时间为3秒钟
                    new ArrayBlockingQueue<>(2));     //这里使用容量为2的ArrayBlockingQueue队列

    for (int i = 0; i < 6; i++) {   //开始6个任务
        int finalI = i;
        executor.execute(() -> {
            try {
                System.out.println(Thread.currentThread().getName()+" 开始执行!("+ finalI);
                TimeUnit.SECONDS.sleep(1);
                System.out.println(Thread.currentThread().getName()+" 已结束!("+finalI);
            } catch (InterruptedException e) {
                e.printStackTrace();
            }
        });
    }

    TimeUnit.SECONDS.sleep(1);    //看看当前线程池中的线程数量
    System.out.println("线程池中线程数量:"+executor.getPoolSize());
    TimeUnit.SECONDS.sleep(5);     //等到超过空闲时间
    System.out.println("线程池中线程数量:"+executor.getPoolSize());

    executor.shutdownNow();    //使用完线程池记得关闭,不然程序不会结束,它会取消所有等待中的任务以及试图中断正在执行的任务,关闭后,无法再提交任务,一律拒绝
  	//executor.shutdown();     同样可以关闭,但是会执行完等待队列中的任务再关闭
}这里我们创建了一个核心容量为2,最大容量为4,等待队列长度为2,空闲时间为3秒的线程池,现在我们向其中执行6个任务,每个任务都会进行1秒钟休眠,那么当线程池中2个核心线程都被占用时,还有4个线程就只能进入到等待队列中了,但是等待队列中只有2个容量,这时紧接着的2个任务,线程池将直接尝试创建线程,由于不大于最大容量,因此可以成功创建。最后所有线程完成之后,在等待5秒后,超过了线程池的最大空闲时间,非核心线程被回收了,所以线程池中只有2个线程存在。
那么要是等待队列设定为没有容量的SynchronousQueue呢,这个时候会发生什么?
pool-1-thread-1 开始执行!(0
pool-1-thread-4 开始执行!(3
pool-1-thread-3 开始执行!(2
pool-1-thread-2 开始执行!(1
Exception in thread "main" java.util.concurrent.RejectedExecutionException: Task com.test.Main$$Lambda$1/1283928880@682a0b20 rejected from java.util.concurrent.ThreadPoolExecutor@3d075dc0[Running, pool size = 4, active threads = 4, queued tasks = 0, completed tasks = 0]
	at java.util.concurrent.ThreadPoolExecutor$AbortPolicy.rejectedExecution(ThreadPoolExecutor.java:2063)
	at java.util.concurrent.ThreadPoolExecutor.reject(ThreadPoolExecutor.java:830)
	at java.util.concurrent.ThreadPoolExecutor.execute(ThreadPoolExecutor.java:1379)
	at com.test.Main.main(Main.java:15)
可以看到,前4个任务都可以正常执行,但是到第五个任务时,直接抛出了异常,这其实就是因为等待队列的容量为0,相当于没有容量,那么这个时候,就只能拒绝任务了,拒绝的操作会根据拒绝策略决定。
线程池的拒绝策略默认有以下几个:
- AbortPolicy(默认):像上面一样,直接抛异常。
- CallerRunsPolicy:直接让提交任务的线程运行这个任务,比如在主线程向线程池提交了任务,那么就直接由主线程执行。
- DiscardOldestPolicy:丢弃队列中最近的一个任务,替换为当前任务。
- DiscardPolicy:什么也不用做。
这里我们进行一下测试:
public static void main(String[] args) throws InterruptedException {
    ThreadPoolExecutor executor =
            new ThreadPoolExecutor(2, 4,
                    3, TimeUnit.SECONDS,
                    new SynchronousQueue<>(),
                    new ThreadPoolExecutor.CallerRunsPolicy());   //使用另一个构造方法,最后一个参数传入策略,比如这里我们使用了CallerRunsPolicy策略
CallerRunsPolicy策略是谁提交的谁自己执行,所以:
pool-1-thread-1 开始执行!(0
pool-1-thread-2 开始执行!(1
main 开始执行!(4
pool-1-thread-4 开始执行!(3
pool-1-thread-3 开始执行!(2
pool-1-thread-3 已结束!(2
pool-1-thread-2 已结束!(1
pool-1-thread-1 已结束!(0
main 已结束!(4
pool-1-thread-4 已结束!(3
pool-1-thread-1 开始执行!(5
pool-1-thread-1 已结束!(5
线程池中线程数量:4
线程池中线程数量:2
可以看到,当队列塞不下时,直接在主线程运行任务,运行完之后再继续向下执行。
我们吧策略修改为DiscardOldestPolicy试试看:
public static void main(String[] args) throws InterruptedException {
    ThreadPoolExecutor executor =
            new ThreadPoolExecutor(2, 4,
                    3, TimeUnit.SECONDS,
                    new ArrayBlockingQueue<>(1),    //这里设置为ArrayBlockingQueue,长度为1
                    new ThreadPoolExecutor.DiscardOldestPolicy());
它会移除等待队列中的最近的一个任务,所以可以看到有一个任务实际上是被抛弃了的:
pool-1-thread-1 开始执行!(0
pool-1-thread-4 开始执行!(4
pool-1-thread-3 开始执行!(3
pool-1-thread-2 开始执行!(1
pool-1-thread-1 已结束!(0
pool-1-thread-4 已结束!(4
pool-1-thread-1 开始执行!(5
线程池中线程数量:4
pool-1-thread-3 已结束!(3
pool-1-thread-2 已结束!(1
pool-1-thread-1 已结束!(5
线程池中线程数量:2
比较有意思的是,如果选择没有容量的SynchronousQueue作为等待队列会爆栈:
pool-1-thread-1 开始执行!(0
pool-1-thread-3 开始执行!(2
pool-1-thread-2 开始执行!(1
pool-1-thread-4 开始执行!(3
Exception in thread "main" java.lang.StackOverflowError
	at java.util.concurrent.SynchronousQueue.offer(SynchronousQueue.java:912)
	at java.util.concurrent.ThreadPoolExecutor.execute(ThreadPoolExecutor.java:1371)
	...
pool-1-thread-1 已结束!(0
pool-1-thread-2 已结束!(1
pool-1-thread-4 已结束!(3
pool-1-thread-3 已结束!(2
这是为什么呢?我们来看看这个拒绝策略的源码:
public static class DiscardOldestPolicy implements RejectedExecutionHandler {
    public DiscardOldestPolicy() { }

    public void rejectedExecution(Runnable r, ThreadPoolExecutor e) {
        if (!e.isShutdown()) {
            e.getQueue().poll();   //会先执行一次出队操作,但是这对于SynchronousQueue来说毫无意义
            e.execute(r);     //这里会再次调用execute方法
        }
    }
}可以看到,它会先对等待队列进行出队操作,但是由于SynchronousQueue压根没容量,所有这个操作毫无意义,然后就会递归执行execute方法,而进入之后,又发现没有容量不能插入,于是又重复上面的操作,这样就会无限的递归下去,最后就爆栈了。
当然,除了使用官方提供的4种策略之外,我们还可以使用自定义的策略:
public static void main(String[] args) throws InterruptedException {
    ThreadPoolExecutor executor =
            new ThreadPoolExecutor(2, 4,
                    3, TimeUnit.SECONDS,
                    new SynchronousQueue<>(),
                    (r, executor1) -> {   //比如这里我们也来实现一个就在当前线程执行的策略
                        System.out.println("哎呀,线程池和等待队列都满了,你自己耗子尾汁吧");
                        r.run();   //直接运行
                    });
接着我们来看线程创建工厂,我们可以自己决定如何创建新的线程:
public static void main(String[] args) throws InterruptedException {
    ThreadPoolExecutor executor =
            new ThreadPoolExecutor(2, 4,
                    3, TimeUnit.SECONDS,
                    new SynchronousQueue<>(),
                    new ThreadFactory() {
                        int counter = 0;
                        @Override
                        public Thread newThread(Runnable r) {
                            return new Thread(r, "我的自定义线程-"+counter++);
                        }
                    });

    for (int i = 0; i < 4; i++) {
        executor.execute(() -> System.out.println(Thread.currentThread().getName()+" 开始执行!"));
    }
}
这里传入的Runnable对象就是我们提交的任务,可以看到需要我们返回一个Thread对象,其实就是线程池创建线程的过程,而如何创建这个对象,以及它的一些属性,就都由我们来决定。
各位有没有想过这样一个情况,如果我们的任务在运行过程中出现异常了,那么是不是会导致线程池中的线程被销毁呢?
public static void main(String[] args) throws InterruptedException {
    ThreadPoolExecutor executor = new ThreadPoolExecutor(1, 1,   //最大容量和核心容量锁定为1
            0, TimeUnit.MILLISECONDS, new LinkedBlockingDeque<>());
    executor.execute(() -> {
        System.out.println(Thread.currentThread().getName());
        throw new RuntimeException("我是异常!");
    });
    TimeUnit.SECONDS.sleep(1);
    executor.execute(() -> {
        System.out.println(Thread.currentThread().getName());
    });
}
可以看到,出现异常之后,再次提交新的任务,执行的线程是一个新的线程了。
除了我们自己创建线程池之外,官方也提供了很多的线程池定义,我们可以使用Executors工具类来快速创建线程池:
public static void main(String[] args) throws InterruptedException {
    ExecutorService executor = Executors.newFixedThreadPool(2);   //直接创建一个固定容量的线程池
}
可以看到它的内部实现为:
public static ExecutorService newFixedThreadPool(int nThreads) {
    return new ThreadPoolExecutor(nThreads, nThreads,
                                  0L, TimeUnit.MILLISECONDS,
                                  new LinkedBlockingQueue<Runnable>());
}
这里直接将最大线程和核心线程数量设定为一样的,并且等待时间为0,因为压根不需要,并且采用的是一个无界的LinkedBlockingQueue作为等待队列。
使用newSingleThreadExecutor来创建只有一个线程的线程池:
public static void main(String[] args) throws InterruptedException {
    ExecutorService executor = Executors.newSingleThreadExecutor();
    //创建一个只有一个线程的线程池
}
原理如下:
public static ExecutorService newSingleThreadExecutor() {
    return new FinalizableDelegatedExecutorService
        (new ThreadPoolExecutor(1, 1,
                                0L, TimeUnit.MILLISECONDS,
                                new LinkedBlockingQueue<Runnable>()));
}
可以看到这里并不是直接创建的一个ThreadPoolExecutor对象,而是套了一层FinalizableDelegatedExecutorService,那么这个又是什么东西呢?
static class FinalizableDelegatedExecutorService
    extends DelegatedExecutorService {
    FinalizableDelegatedExecutorService(ExecutorService executor) {
        super(executor);
    }
    protected void finalize() {    //在GC时,会执行finalize方法,此方法中会关闭掉线程池,释放资源
        super.shutdown();
    }
}static class DelegatedExecutorService extends AbstractExecutorService {
private final ExecutorService e; //被委派对象
DelegatedExecutorService(ExecutorService executor) { e = executor; } //实际上所以的操作都是让委派对象执行的,有点像代理
public void execute(Runnable command) { e.execute(command); }
public void shutdown() { e.shutdown(); }
public List<Runnable> shutdownNow() { return e.shutdownNow(); }所以,下面两种写法的区别在于:
public static void main(String[] args) throws InterruptedException {
    ExecutorService executor1 = Executors.newSingleThreadExecutor();
    ExecutorService executor2 = Executors.newFixedThreadPool(1);
}
前者实际上是被代理了,我们没办法直接修改前者的相关属性,显然使用前者创建只有一个线程的线程池更加专业和安全(可以防止属性被修改)一些。
最后我们来看newCachedThreadPool方法:
public static void main(String[] args) throws InterruptedException {
    ExecutorService executor = Executors.newCachedThreadPool();
    //它是一个会根据需要无限制创建新线程的线程池
}
我们来看看它的实现:
public static ExecutorService newCachedThreadPool() {
    return new ThreadPoolExecutor(0, Integer.MAX_VALUE,
                                  60L, TimeUnit.SECONDS,
                                  new SynchronousQueue<Runnable>());
}可以看到,核心线程数为0,那么也就是说所有的线程都是非核心线程,也就是说线程空闲时间超过1秒钟,一律销毁。但是它的最大容量是Integer.MAX_VALUE,也就是说,它可以无限制地增长下去,所以这玩意一定要慎用。
执行带返回值的任务
一个多线程任务不仅仅可以是void无返回值任务,比如我们现在需要执行一个任务,但是我们需要在任务执行之后得到一个结果,这个时候怎么办呢?
这里我们就可以使用到Future了,它可以返回任务的计算结果,我们可以通过它来获取任务的结果以及任务当前是否完成:
public static void main(String[] args) throws InterruptedException, ExecutionException {
    ExecutorService executor = Executors.newSingleThreadExecutor();   //直接用Executors创建,方便就完事了
    Future<String> future = executor.submit(() -> "我是字符串!");     //使用submit提交任务,会返回一个Future对象,注意提交的对象可以是Runable也可以是Callable,这里使用的是Callable能够自定义返回值
    System.out.println(future.get());    //如果任务未完成,get会被阻塞,任务完成返回Callable执行结果返回值
    executor.shutdown();
}
当然结果也可以一开始就定义好,然后等待Runnable执行完之后再返回:
public static void main(String[] args) throws InterruptedException, ExecutionException {
    ExecutorService executor = Executors.newSingleThreadExecutor();
    Future<String> future = executor.submit(() -> {
        try {
            TimeUnit.SECONDS.sleep(3);
        } catch (InterruptedException e) {
            e.printStackTrace();
        }
    }, "我是字符串!");
    System.out.println(future.get());
    executor.shutdown();
}
还可以通过传入FutureTask对象的方式:
public static void main(String[] args) throws ExecutionException, InterruptedException {
    ExecutorService service = Executors.newSingleThreadExecutor();
    FutureTask<String> task = new FutureTask<>(() -> "我是字符串!");
    service.submit(task);
    System.out.println(task.get());
    executor.shutdown();
}
我们可以还通过Future对象获取当前任务的一些状态:
public static void main(String[] args) throws ExecutionException, InterruptedException {
    ExecutorService executor = Executors.newSingleThreadExecutor();
    Future<String> future = executor.submit(() -> "都看到这里了,不赏UP主一个一键三连吗?");
    System.out.println(future.get());
    System.out.println("任务是否执行完成:"+future.isDone());
    System.out.println("任务是否被取消:"+future.isCancelled());
    executor.shutdown();
}
我们来试试看在任务执行途中取消任务:
public static void main(String[] args) throws ExecutionException, InterruptedException {
    ExecutorService executor = Executors.newSingleThreadExecutor();
    Future<String> future = executor.submit(() -> {
        TimeUnit.SECONDS.sleep(10);
        return "这次一定!";
    });
    System.out.println(future.cancel(true));
    System.out.println(future.isCancelled());
    executor.shutdown();
}
执行定时任务
既然线程池怎么强大,那么线程池能不能执行定时任务呢?我们之前如果需要执行一个定时任务,那么肯定会用到Timer和TimerTask,但是它只会创建一个线程处理我们的定时任务,无法实现多线程调度,并且它无法处理异常情况一旦抛出未捕获异常那么会直接终止,显然我们需要一个更加强大的定时器。
JDK5之后,我们可以使用ScheduledThreadPoolExecutor来提交定时任务,它继承自ThreadPoolExecutor,并且所有的构造方法都必须要求最大线程池容量为Integer.MAX_VALUE,并且都是采用的DelayedWorkQueue作为等待队列。
public ScheduledThreadPoolExecutor(int corePoolSize) {
    super(corePoolSize, Integer.MAX_VALUE, 0, NANOSECONDS,
          new DelayedWorkQueue());
}

public ScheduledThreadPoolExecutor(int corePoolSize,
                                   ThreadFactory threadFactory) {
    super(corePoolSize, Integer.MAX_VALUE, 0, NANOSECONDS,
          new DelayedWorkQueue(), threadFactory);
}

public ScheduledThreadPoolExecutor(int corePoolSize,
                                   RejectedExecutionHandler handler) {
    super(corePoolSize, Integer.MAX_VALUE, 0, NANOSECONDS,
          new DelayedWorkQueue(), handler);
}

public ScheduledThreadPoolExecutor(int corePoolSize,
                                   ThreadFactory threadFactory,
                                   RejectedExecutionHandler handler) {
    super(corePoolSize, Integer.MAX_VALUE, 0, NANOSECONDS,
          new DelayedWorkQueue(), threadFactory, handler);
}
我们来测试一下它的方法,这个方法可以提交一个延时任务,只有到达指定时间之后才会开始:
public static void main(String[] args) throws ExecutionException, InterruptedException {
  	//直接设定核心线程数为1
    ScheduledThreadPoolExecutor executor = new ScheduledThreadPoolExecutor(1);
    //这里我们计划在3秒后执行
    executor.schedule(() -> System.out.println("HelloWorld!"), 3, TimeUnit.SECONDS);

    executor.shutdown();
}
我们也可以像之前一样,传入一个Callable对象,用于接收返回值:
public static void main(String[] args) throws ExecutionException, InterruptedException {
    ScheduledThreadPoolExecutor executor = new ScheduledThreadPoolExecutor(2);
  	//这里使用ScheduledFuture
    ScheduledFuture<String> future = executor.schedule(() -> "????", 3, TimeUnit.SECONDS);
    System.out.println("任务剩余等待时间:"+future.getDelay(TimeUnit.MILLISECONDS) / 1000.0 + "s");
    System.out.println("任务执行结果:"+future.get());
    executor.shutdown();
}可以看到schedule方法返回了一个ScheduledFuture对象,和Future一样,它也支持返回值的获取、包括对任务的取消同时还支持获取剩余等待时间。
那么如果我们希望按照一定的频率不断执行任务呢?
public static void main(String[] args) throws ExecutionException, InterruptedException {
    ScheduledThreadPoolExecutor executor = new ScheduledThreadPoolExecutor(2);
    executor.scheduleAtFixedRate(() -> System.out.println("Hello World!"),
            3, 1, TimeUnit.SECONDS);
  	//三秒钟延迟开始,之后每隔一秒钟执行一次
}
Executors也为我们预置了newScheduledThreadPool方法用于创建线程池:
public static void main(String[] args) throws ExecutionException, InterruptedException {
    ScheduledExecutorService service = Executors.newScheduledThreadPool(1);
    service.schedule(() -> System.out.println("Hello World!"), 1, TimeUnit.SECONDS);
}